I had some errands to run this week and had to skip class. Between Networking and Communication, I found the latter to be more fascinating. In fact, I had always wanted to explore how RFID/NFC works for a very long time and never quite had the right opportunity. So here we go.
To start with, some basic information I found online and organized by ChatGPT:
What is RFID?
RFID (Radio-Frequency Identification) is a broad family of technologies where tags are read wirelessly by a reader using radio waves. RFID systems exist in several frequency bands:
- LF (Low Frequency, ~125–134 kHz) – short range, often used for simple access badges or hotel keys.
- HF (High Frequency, 13.56 MHz) – used for contactless cards and tickets.
- UHF (Ultra High Frequency, ~860–960 MHz) – longer range, common in logistics and warehouse tracking.
Many RFID tags are simple and mostly one-way: the reader powers the tag and reads an ID or small amount of data. It is great for fast, large-scale identification.
What is NFC?
NFC (Near Field Communication) is a specific subset of HF RFID that also operates at 13.56 MHz, but is designed for close-range, secure, user-initiated interactions.
- Very short range (a few centimeters).
- Supports two-way communication between devices.
- Enables card emulation, so a phone or watch can behave like a transit card or credit card.
- Used for contactless payments, transit gates, and phone-to-device tapping.
Simply put, every NFC system is RFID, but not every RFID system is NFC.
Many years ago I was in Tokyo and I had this friend who at the time worked at NEC Japan, the very company behind the NFC tech for every subway gate. At the time he was very proud and bragged about the advance technology that Tokyo used and how fast those doors can slide open within hundreds of a second and no passenger would need to fear they may be blocked by the bar and got hurt. He briefly mentioned the NFC then and I vaguely remembered the technology that was used. Many years later, I have been to way more cities and countries than I was then and having compared all the subway gates. I guess I had to admit, in terms of gate opening speed, Tokyo is the best in the world and beating all other countries by a lot.
This memory led me to think about how the subway gates work in different cities, especially comparing Boston and Tokyo, since I have used both extensively. After a bit of research, here's a breakdown of how the systems operate in Boston and Tokyo:
Boston vs Tokyo: How the Gates Work
Tokyo (Suica / PASMO)
- Uses IC cards (Suica, PASMO) and mobile versions on phones and watches.
- Tap once at entry and once at exit; the same card works across most trains, subways, and many buses in the Greater Tokyo area.
- Underlying tech: FeliCa (NFC-F) on HF RFID.
Boston (MBTA / "the T")
- Uses the CharlieCard, a contactless smart card based on MIFARE (HF RFID).
- Historically, you tapped the CharlieCard at entry only; subway fares are flat within the system.
- As of 2024, the MBTA has begun rolling out a new system where riders can tap contactless credit/debit cards or phones directly at subway and bus gates ("tap-to-pay", Automated Fare Collection 2.0).
Quick Technical Comparison
| Feature | Tokyo (Suica / PASMO) | Boston (MBTA) |
|---|---|---|
| Primary card | Suica / PASMO IC cards | CharlieCard smart card |
| Core technology | FeliCa (NFC-F, HF RFID) | MIFARE-based HF RFID |
| Phone & watch support | Mobile Suica / PASMO, Apple Pay | Contactless credit/debit, mobile wallets (AFC 2.0) |
| User-facing terminology | "IC card" (rarely called NFC) | "CharlieCard" / "tap-to-pay" |
| Network coverage | Most rail & bus operators across Greater Tokyo | MBTA subway & buses; commuter rail/ferry via phased rollout |
In summary, both cities are using HF RFID smart cards at their gates. Tokyo's system is built around FeliCa-based NFC cards (Suica/PASMO), while Boston's system historically relied on a MIFARE-based transit card (CharlieCard) and is now adding NFC-based open-loop payments with bank cards and phones.
I referred to a few online resources to gather this information, and one particular site I found really helpful Link Here
Another document I found really helpful is the datasheet of XIAO ESP32S3 Download Here
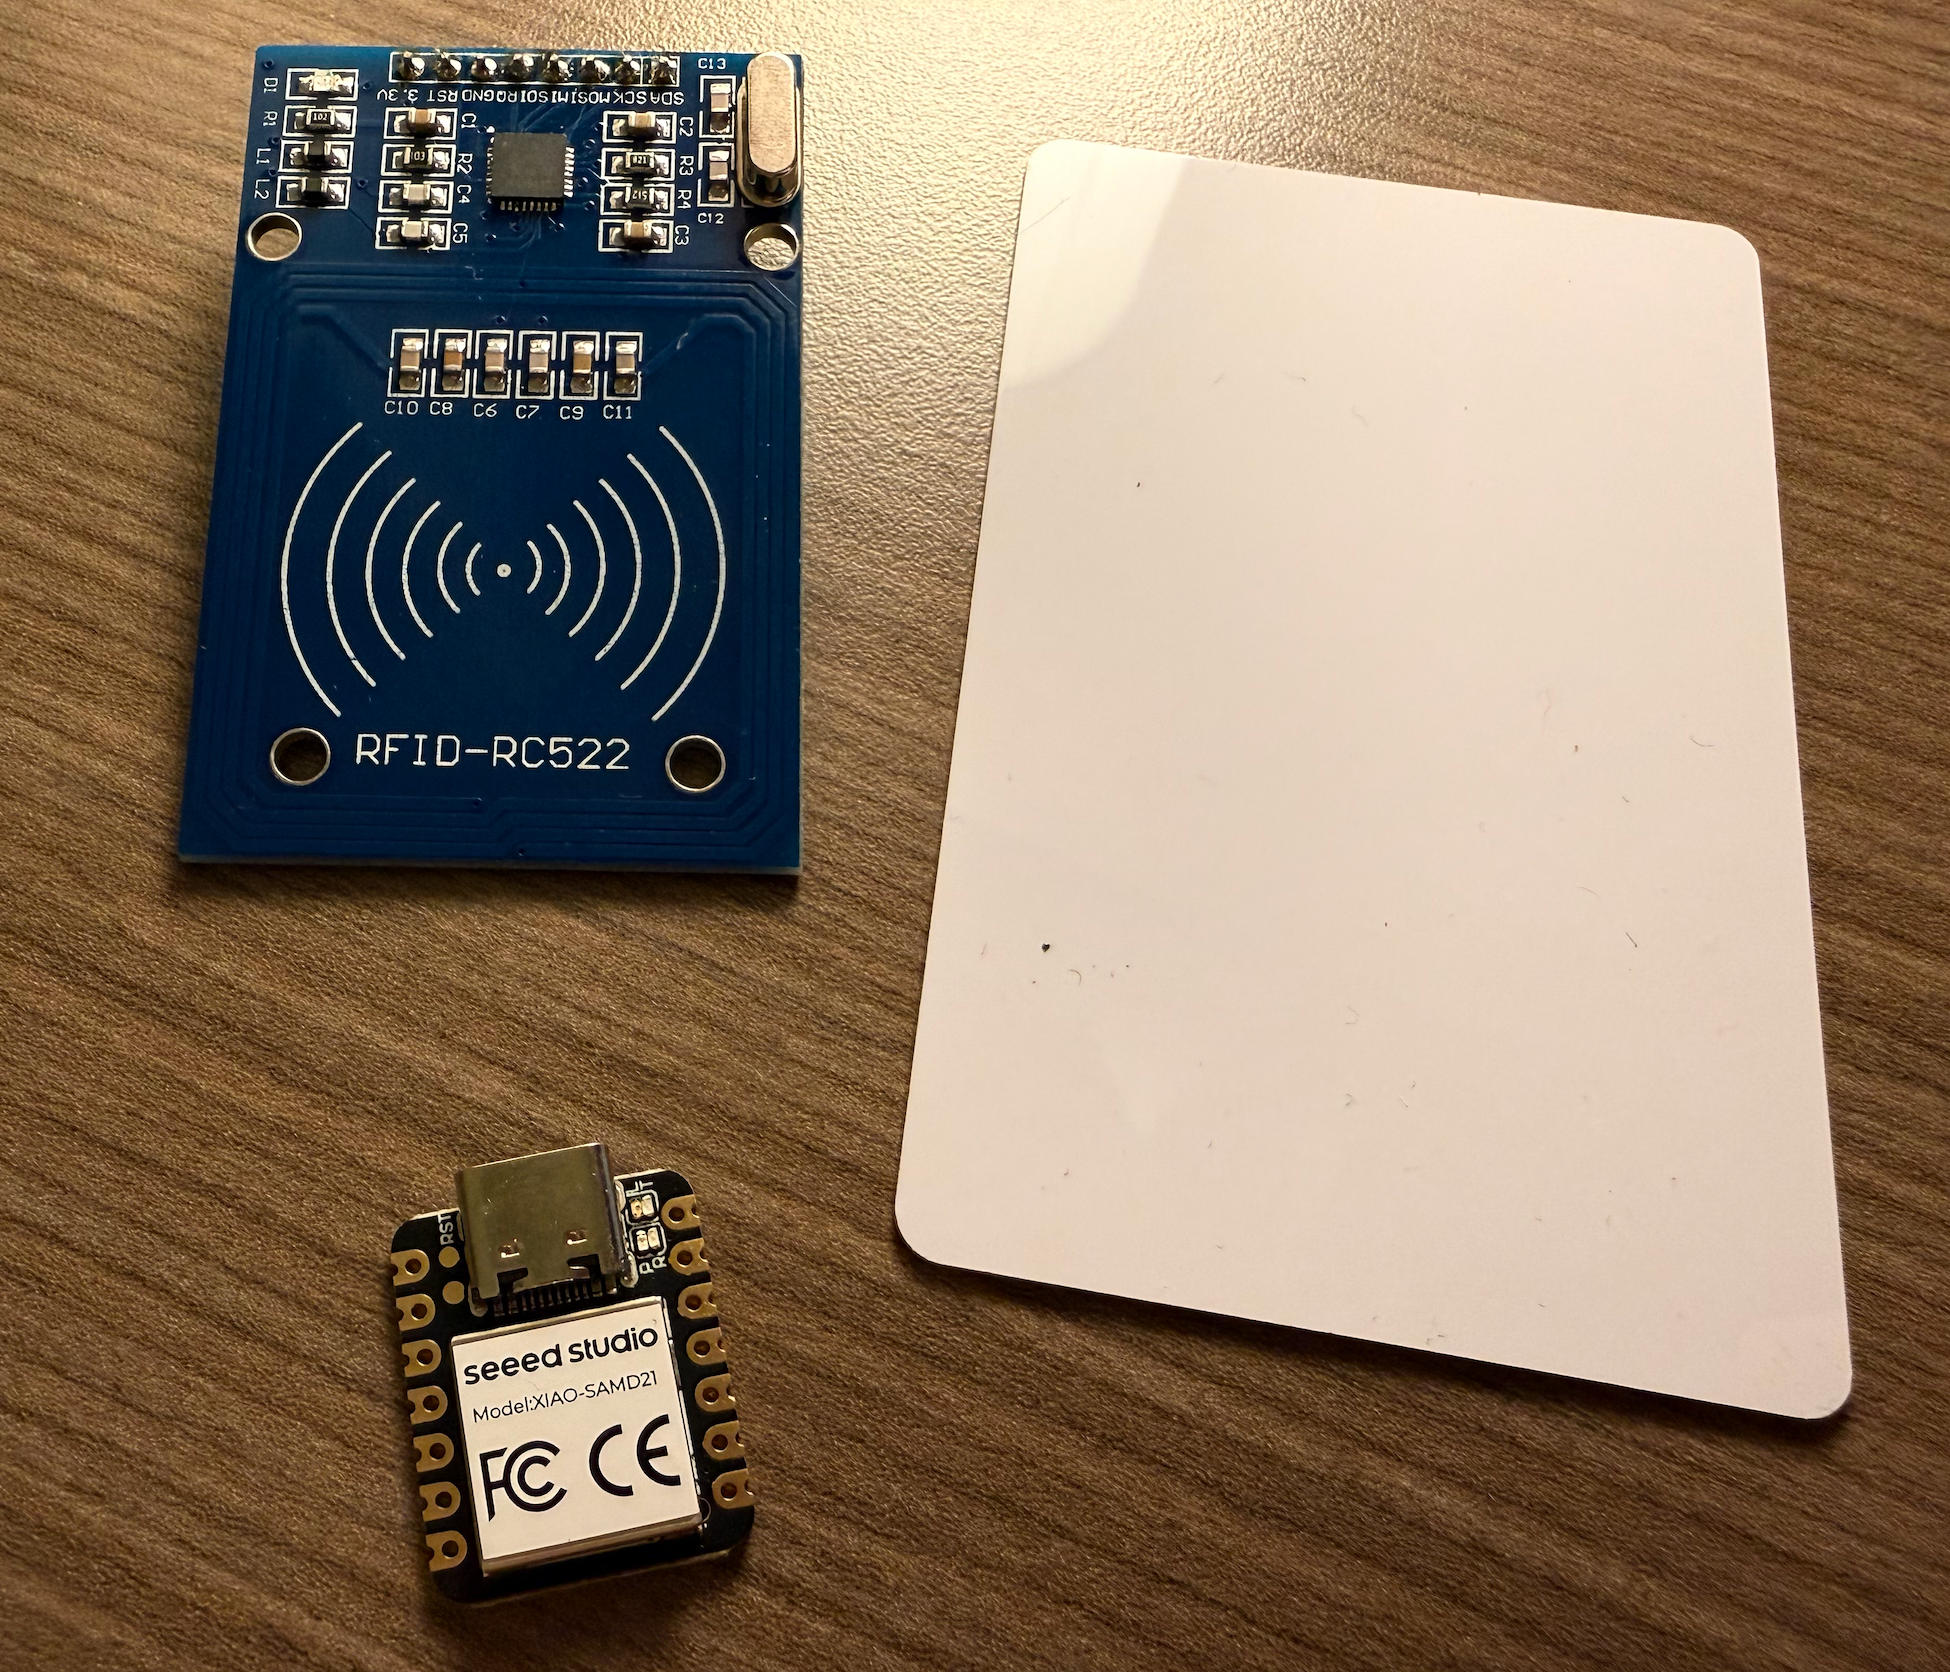
RFID-RCC522's spec document Here.
Files Download
#include <SPI.h>
#include <MFRC522.h>
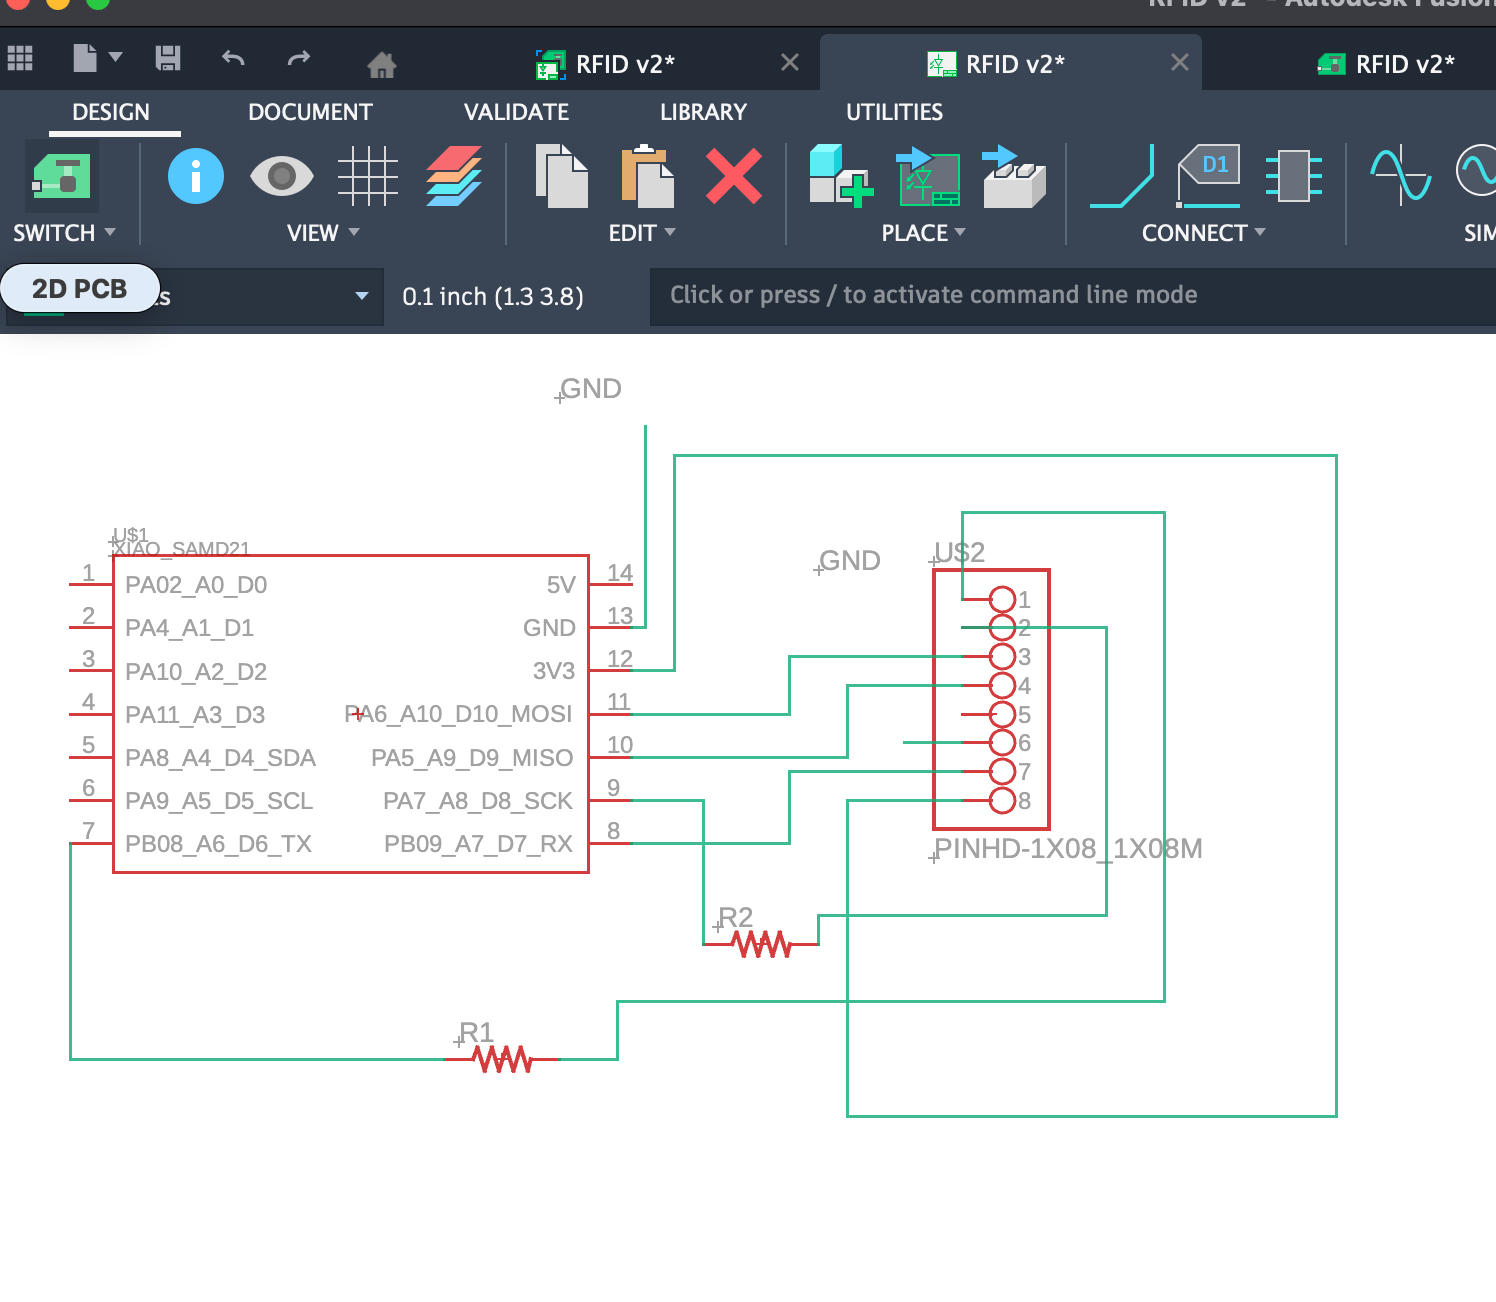
// Your wiring:
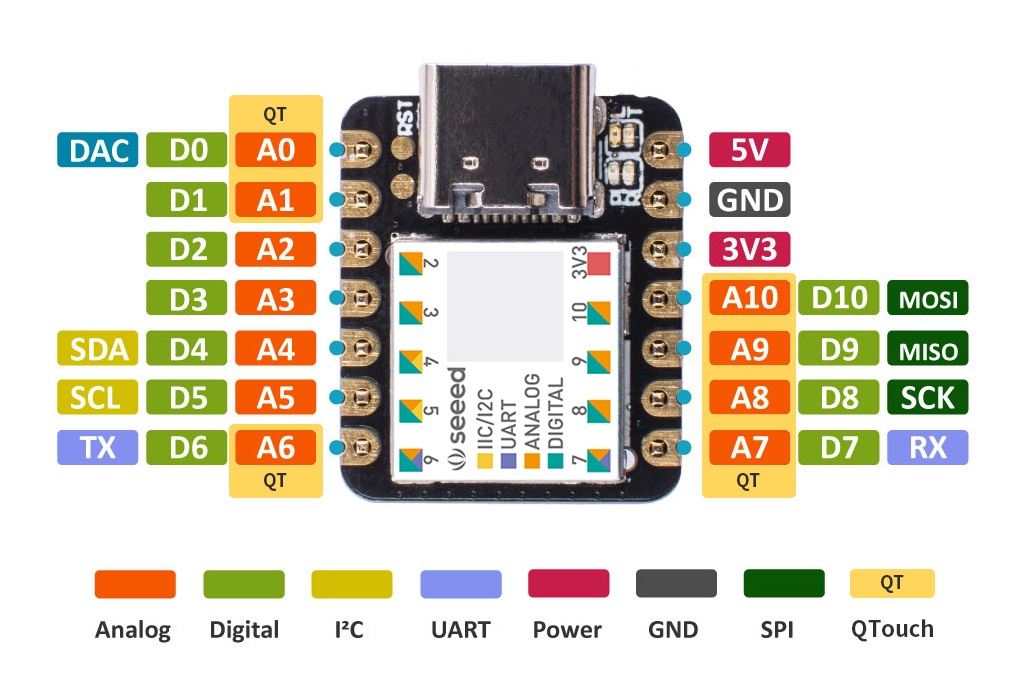
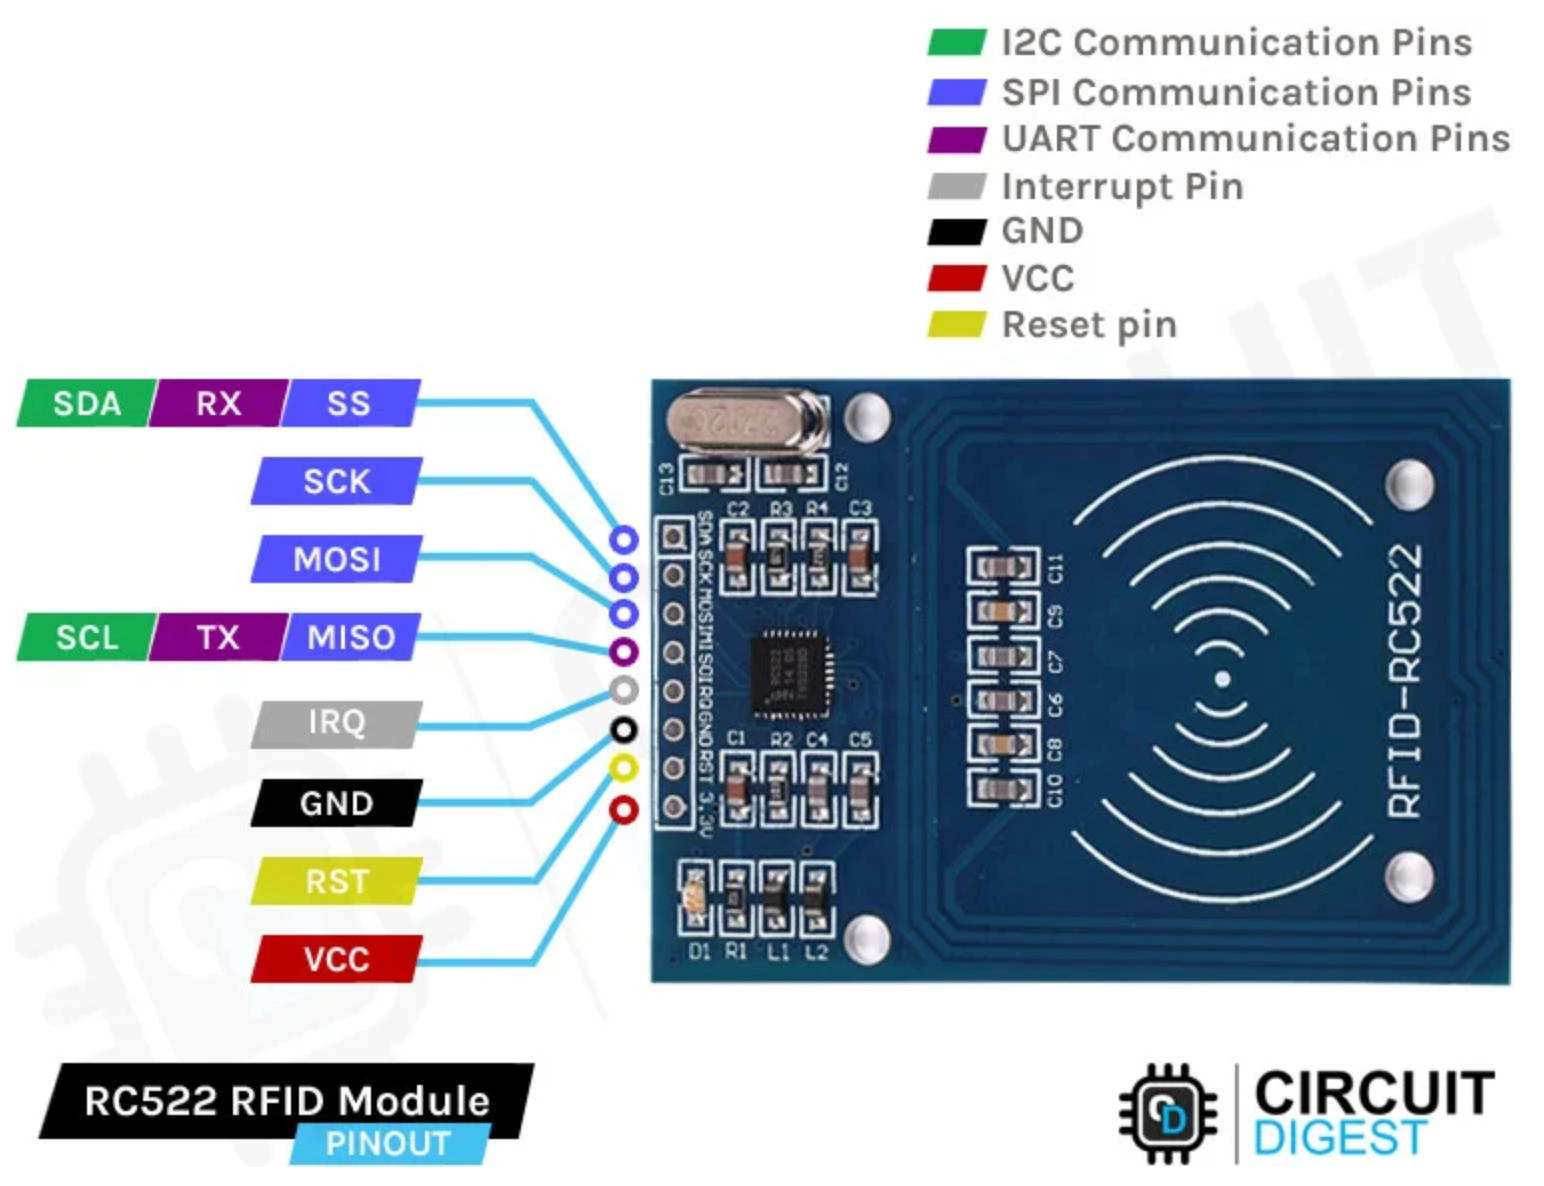
const uint8_t SS_PIN = 6; // RC522 SDA pin -> XIAO D6 (Chip Select)
const uint8_t RST_PIN = 7; // RC522 RST pin -> XIAO D7
MFRC522 rfid(SS_PIN, RST_PIN); // Create MFRC522 instance
void setup() {
// Start serial for debugging
Serial.begin(115200);
while (!Serial) {
; // Wait for Serial on SAMD21 (so you can see messages)
}
Serial.println("Booting...");
Serial.println("Initializing SPI and RC522...");
// Initialize SPI bus (D8=SCK, D9=MISO, D10=MOSI on XIAO SAMD21)
SPI.begin();
// Initialize RC522 reader
rfid.PCD_Init();
delay(50);
// Optional: Show reader details
Serial.print("MFRC522 Firmware version: 0x");
byte v = rfid.PCD_ReadRegister(MFRC522::VersionReg);
Serial.println(v, HEX);
if (v == 0x00 || v == 0xFF) {
Serial.println("WARNING: Could not communicate with RC522.");
Serial.println("Check wiring and power (3.3V, GND, SS=D6, RST=D7, MOSI=D10, MISO=D9, SCK=D8).");
} else {
Serial.println("RC522 initialized successfully. Present a card to the reader.");
}
}
void loop() {
// Look for new cards
if (!rfid.PICC_IsNewCardPresent()) {
return; // No new card
}
// Select one of the cards
if (!rfid.PICC_ReadCardSerial()) {
return; // Read error
}
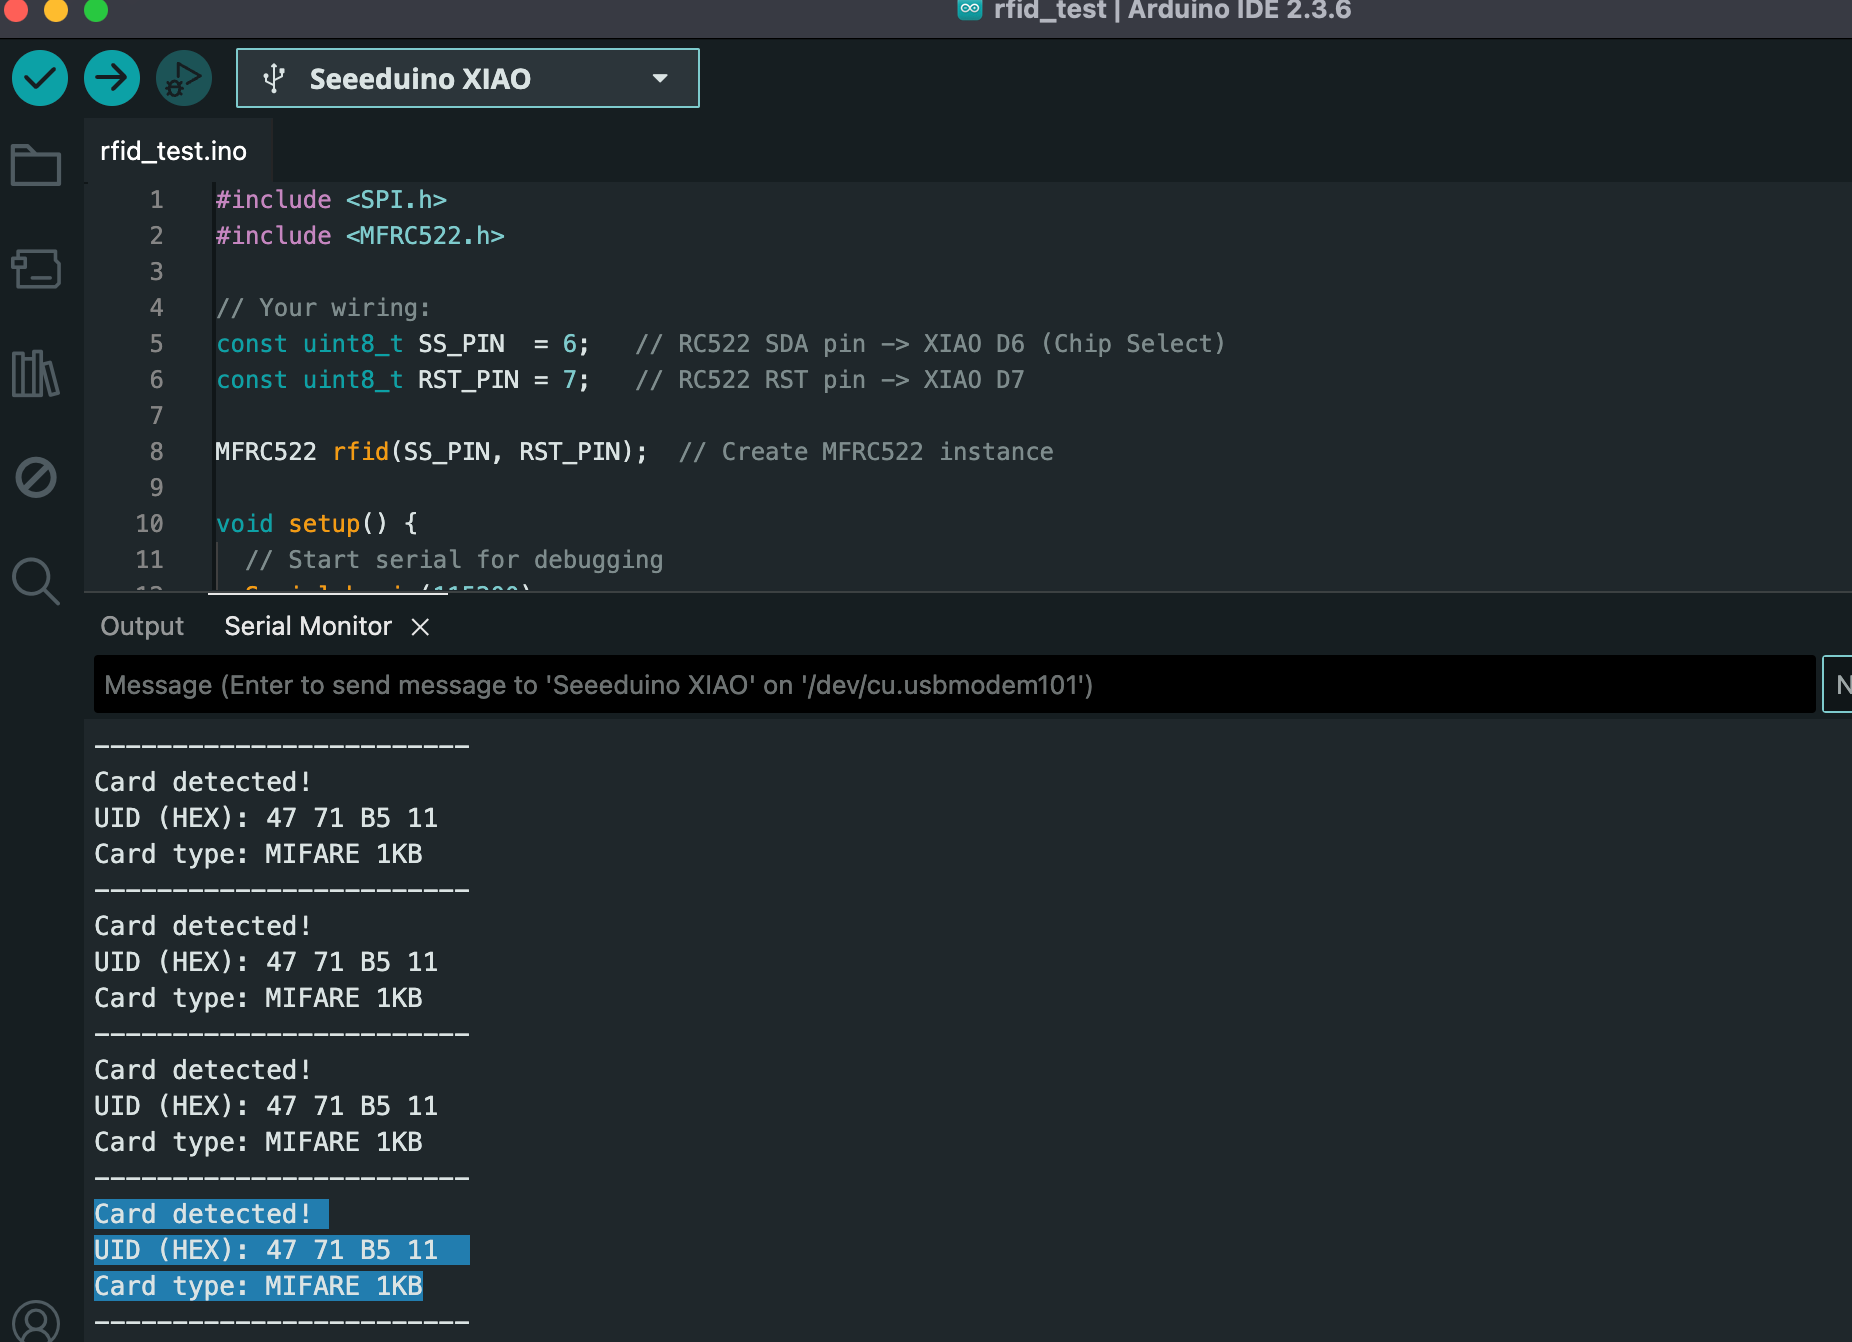
Serial.println("Card detected!");
// Print UID in HEX
Serial.print("UID (HEX): ");
for (byte i = 0; i < rfid.uid.size; i++) {
if (rfid.uid.uidByte[i] < 0x10) {
Serial.print("0"); // leading zero
}
Serial.print(rfid.uid.uidByte[i], HEX);
Serial.print(" ");
}
Serial.println();
// Print card type
MFRC522::PICC_Type piccType = rfid.PICC_GetType(rfid.uid.sak);
Serial.print("Card type: ");
Serial.println(rfid.PICC_GetTypeName(piccType));
Serial.println("------------------------");
// Halt the card and stop encryption (good practice)
rfid.PICC_HaltA();
rfid.PCD_StopCrypto1();
delay(200); // small delay so output is readable
}
#include <SPI.h>
#include <MFRC522.h>

const uint8_t SS_PIN  = 6;   // RC522 SDA -> XIAO D6
const uint8_t RST_PIN = 7;   // RC522 RST -> XIAO D7

MFRC522 rfid(SS_PIN, RST_PIN);

// 👉 Replace this with the UID you want to "allow"
byte allowedUID[] = {0x47, 0x71, 0xB5, 0x11};
byte allowedUIDLength = 4;

bool compareUID(byte* uid, byte uidSize,
                byte* allowed, byte allowedSize) {
  if (uidSize != allowedSize) return false;
  for (byte i = 0; i < uidSize; i++) {
    if (uid[i] != allowed[i]) return false;
  }
  return true;
}

void setup() {
  Serial.begin(115200);
  while (!Serial) {;}

  Serial.println("RFID Access Demo - Present a card.");

  SPI.begin();
  rfid.PCD_Init();
  delay(50);

  Serial.print("Firmware version: 0x");
  Serial.println(
    rfid.PCD_ReadRegister(MFRC522::VersionReg),
    HEX
  );
}

void loop() {
  if (!rfid.PICC_IsNewCardPresent()) return;
  if (!rfid.PICC_ReadCardSerial()) return;

  Serial.println("Card detected!");

  // Print UID
  Serial.print("UID (HEX): ");
  for (byte i = 0; i < rfid.uid.size; i++) {
    if (rfid.uid.uidByte[i] < 0x10)
      Serial.print("0");
    Serial.print(rfid.uid.uidByte[i], HEX);
    Serial.print(" ");
  }
  Serial.println();

  // Check if this is the allowed card
  if (compareUID(
        rfid.uid.uidByte,
        rfid.uid.size,
        allowedUID,
        allowedUIDLength)) {
    Serial.println("✅ Access GRANTED (known card)");
  } else {
    Serial.println("❌ Access DENIED (unknown card)");
  }

  Serial.println("------------------------");

  rfid.PICC_HaltA();
  rfid.PCD_StopCrypto1();

  delay(200);
}
#include <SPI.h>
#include <MFRC522.h>
const uint8_t SS_PIN = 6; // RC522 SDA -> XIAO D6
const uint8_t RST_PIN = 7; // RC522 RST -> XIAO D7
MFRC522 rfid(SS_PIN, RST_PIN);
MFRC522::MIFARE_Key key;
const byte BLOCK_TO_WRITE = 4; // Sector 1, Block 4 on a MIFARE 1K card
// The string we want to store: "HTMAA 2025 TONY"
byte dataBlock[16] = {
'H', 'T', 'M', 'A', 'A', ' ', '2', '0',
'2', '5', ' ', 'T', 'O', 'N', 'Y', 0x00 // last byte = 0x00 padding
};
void printBlock(byte* buffer, byte bufferSize) {
Serial.print("HEX: ");
for (byte i = 0; i < bufferSize; i++) {
if (buffer[i] < 0x10) Serial.print("0");
Serial.print(buffer[i], HEX);
Serial.print(" ");
}
Serial.println();
Serial.print("ASCII: ");
for (byte i = 0; i < bufferSize; i++) {
char c = (char)buffer[i];
if (c >= 32 && c <= 126) {
Serial.print(c);
} else {
Serial.print(".");
}
}
Serial.println();
}
void setup() {
Serial.begin(115200);
while (!Serial) {;}
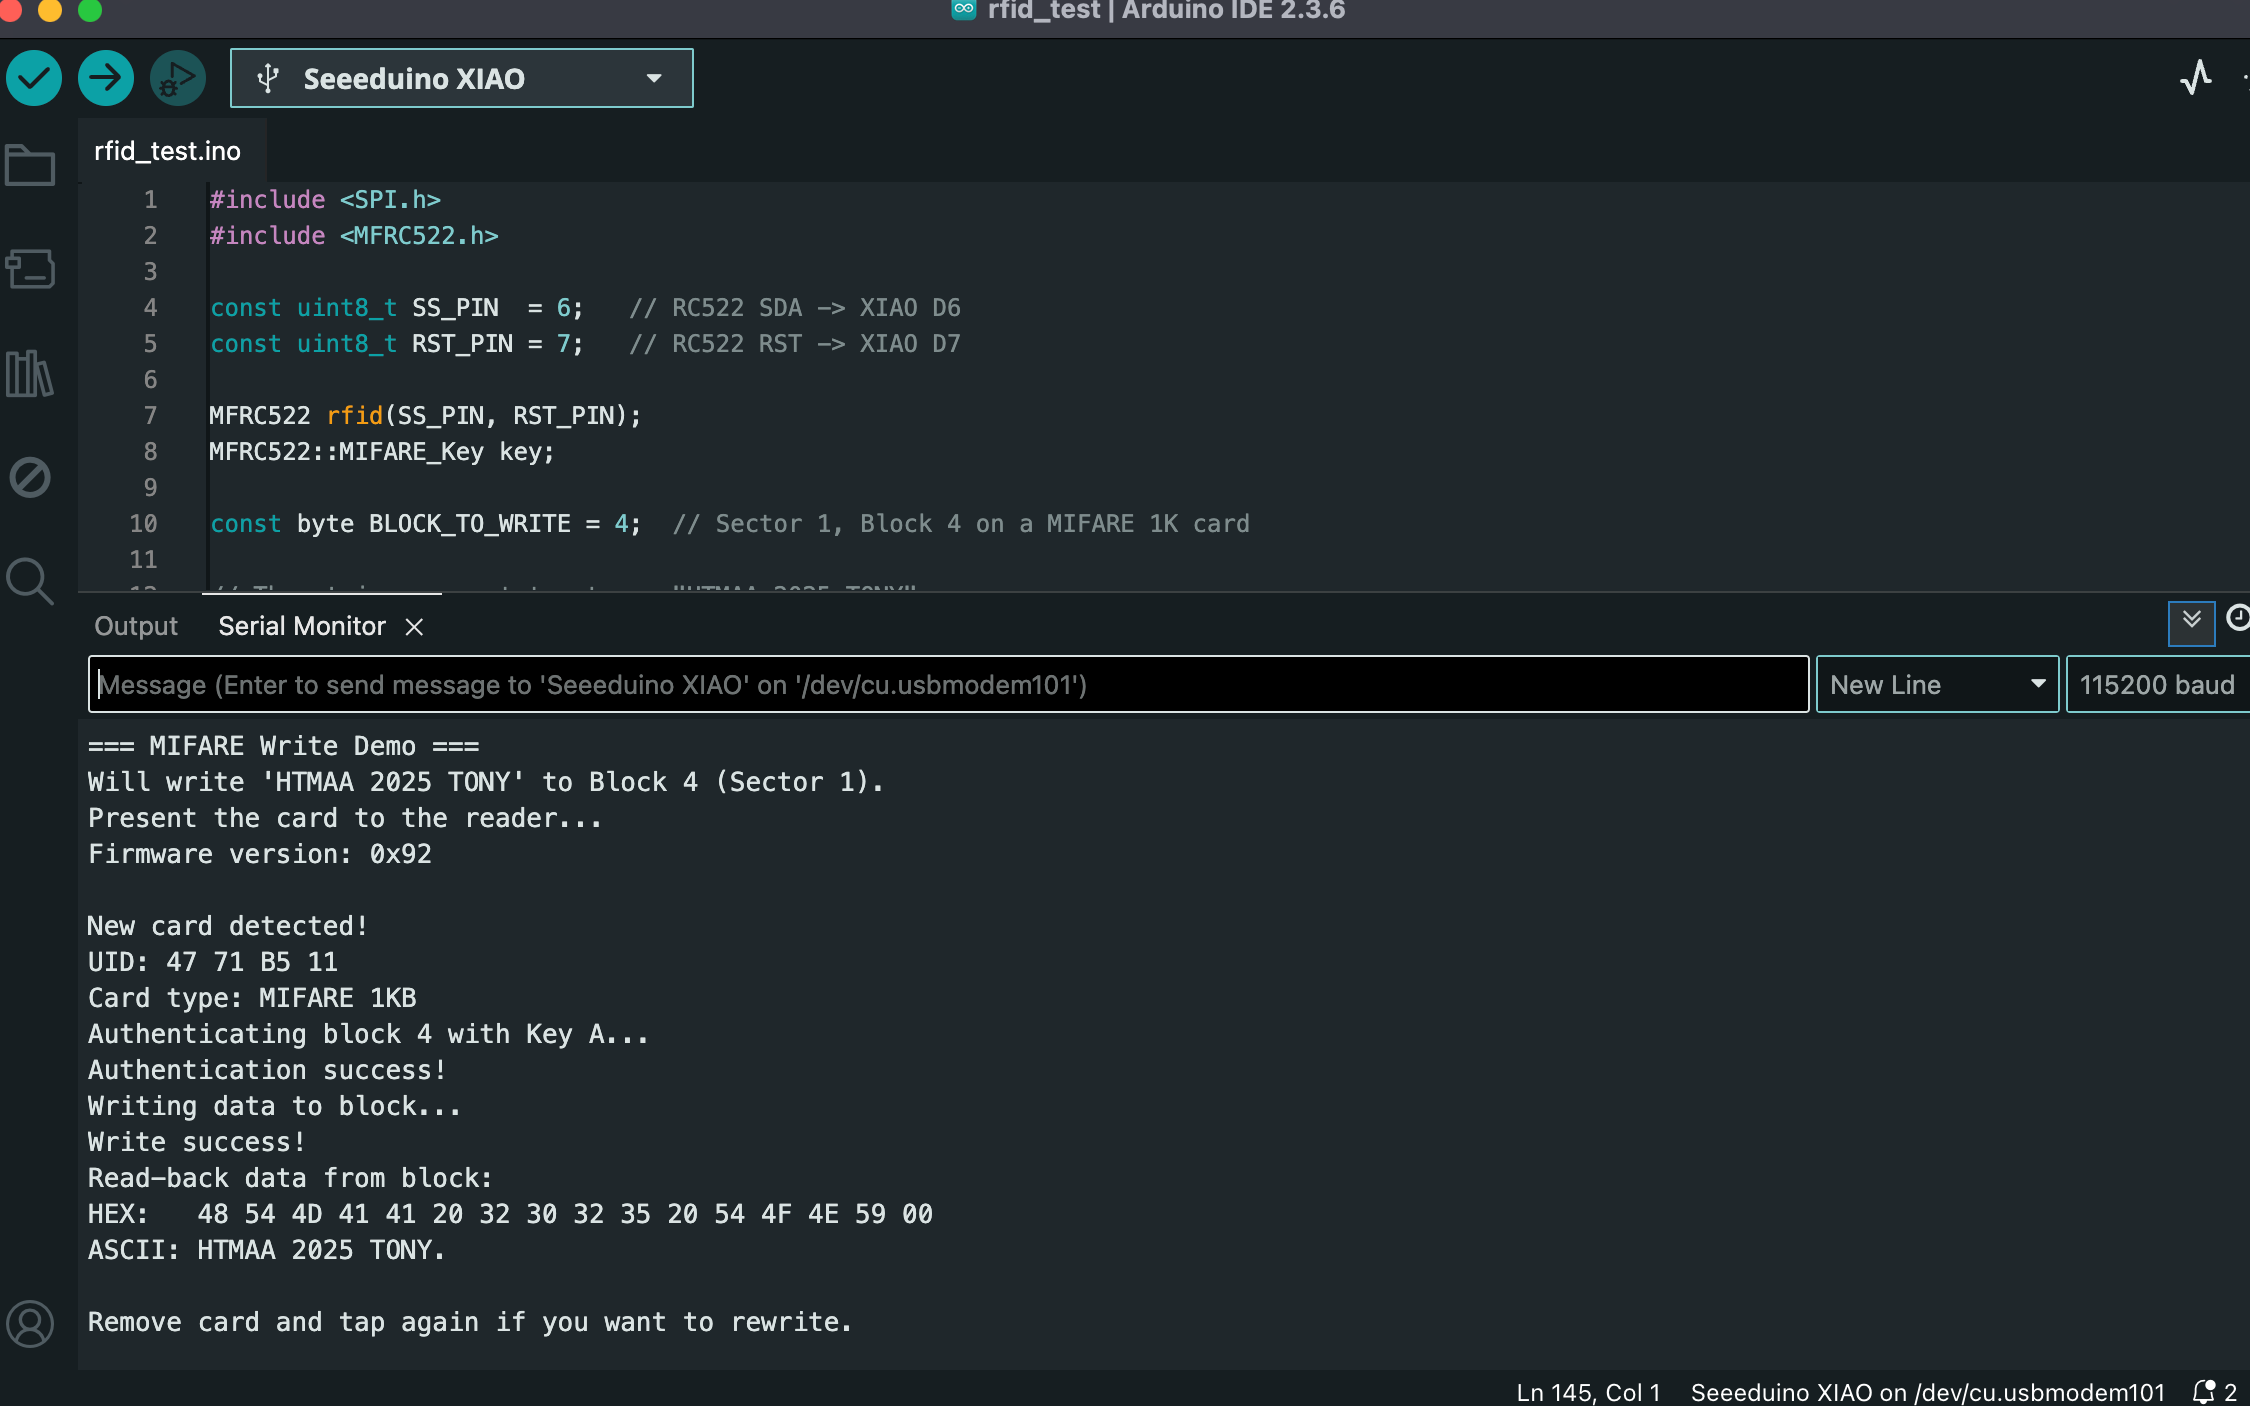
Serial.println("=== MIFARE Write Demo ===");
Serial.println("Will write 'HTMAA 2025 TONY' to Block 4 (Sector 1).");
Serial.println("Present the card to the reader...");
// Set default key = FF FF FF FF FF FF
for (byte i = 0; i < 6; i++) {
key.keyByte[i] = 0xFF;
}
SPI.begin();
rfid.PCD_Init();
delay(50);
Serial.print("Firmware version: 0x");
Serial.println(rfid.PCD_ReadRegister(MFRC522::VersionReg), HEX);
}
void loop() {
// Wait for a card
if (!rfid.PICC_IsNewCardPresent()) return;
if (!rfid.PICC_ReadCardSerial()) return;
Serial.println("\nNew card detected!");
// Print UID
Serial.print("UID: ");
for (byte i = 0; i < rfid.uid.size; i++) {
if (rfid.uid.uidByte[i] < 0x10) Serial.print("0");
Serial.print(rfid.uid.uidByte[i], HEX);
Serial.print(" ");
}
Serial.println();
MFRC522::PICC_Type piccType = rfid.PICC_GetType(rfid.uid.sak);
Serial.print("Card type: ");
Serial.println(rfid.PICC_GetTypeName(piccType));
// Only proceed for MIFARE Classic types
if (piccType != MFRC522::PICC_TYPE_MIFARE_1K &&
piccType != MFRC522::PICC_TYPE_MIFARE_4K &&
piccType != MFRC522::PICC_TYPE_MIFARE_MINI) {
Serial.println("This is not a MIFARE Classic-type card. Aborting.");
rfid.PICC_HaltA();
rfid.PCD_StopCrypto1();
return;
}
// --- Authenticate the block using Key A ---
Serial.print("Authenticating block ");
Serial.print(BLOCK_TO_WRITE);
Serial.println(" with Key A...");
MFRC522::StatusCode status;
status = rfid.PCD_Authenticate(
MFRC522::PICC_CMD_MF_AUTH_KEY_A,
BLOCK_TO_WRITE,
&key,
&(rfid.uid)
);
if (status != MFRC522::STATUS_OK) {
Serial.print("Authentication failed: ");
Serial.println(rfid.GetStatusCodeName(status));
rfid.PICC_HaltA();
rfid.PCD_StopCrypto1();
return;
}
Serial.println("Authentication success!");
// --- Write data to the block ---
Serial.println("Writing data to block...");
status = rfid.MIFARE_Write(BLOCK_TO_WRITE, dataBlock, 16);
if (status != MFRC522::STATUS_OK) {
Serial.print("Write failed: ");
Serial.println(rfid.GetStatusCodeName(status));
rfid.PICC_HaltA();
rfid.PCD_StopCrypto1();
return;
}
Serial.println("Write success!");
// --- Read back for verification ---
byte readBuffer[18];
byte size = sizeof(readBuffer);
status = rfid.MIFARE_Read(BLOCK_TO_WRITE, readBuffer, &size);
if (status != MFRC522::STATUS_OK) {
Serial.print("Read-back failed: ");
Serial.println(rfid.GetStatusCodeName(status));
} else {
Serial.println("Read-back data from block:");
printBlock(readBuffer, 16);
}
// Clean up
rfid.PICC_HaltA();
rfid.PCD_StopCrypto1();
Serial.println("\nRemove card and tap again if you want to rewrite.");
delay(500);
}
Update on Feb 17th, 2026
After finishing the RC522 experiments, I realized this is actually a pretty fun project. I am thinking of doing some more experiments with RFID. My initial thought is to try to copy the very card every MIT student owns -- the MIT student card. Coincidentally, I found this report made about two decades ago by a MIT committee to see how vulnerable the MIT card then was when it faced secuirty/privacy attacks.
The report link: https://groups.csail.mit.edu/mac/classes/6.805/student-papers/fall04-papers/mit_id/#rfid
Also a student's link about how to copy the MIT card in 2023 (we will see if the system had been updated since then to render this method invalid): https://fab.cba.mit.edu/classes/863.23/EECS/people/Yohan/week3/